
As fun as Halloween is, it can also be stressful. Thinking of that perfectly spooky yet witty costume to simultaneously impress and terrify your friends can be a challenge. Whether you’re a Party City groupie or an avid DIY crafter, your makeup choice can make or break your costume. We asked local beauty experts Hannah Walker and Emily Boulin to give us four step-by-step makeup tutorials that will leave you feeling ghoulishly glamorous.
Scar Face
What You’ll Need:
- Mehron Makeup Rigid Collodion
- Mac Cosmetics Pink Lip Pencil—any light pink color will do
- Ben Nye Neutral Set Colorless Setting Powder
- Mac Cosmetics Concealer—any concealer will work as long as it matches your skin tone
Step 1: Draw your scar with a light pink lip pencil. You can make this line a little thicker and darker, by going over it a second time. Gently “smudge” the line with your finger so that the pink isn’t too bold.
Step 2: Apply one layer of rigid collodion to the line you have created. Repeat this step 5-10 times until you have reached your desired scar depth. Make sure to allow time for the rigid collodion to dry in between applications.
Step 3: Apply translucent setting powder with a brush onto your scar.
Step 4: Using a brush, apply a tiny amount of concealer to the outside of the scar and begin to blend the concealer into your skin to camouflage the edges by using your finger or a brush.
Final Cut
What You’ll Need:
- Ben Nye Nose and Scar Wax
- Vaseline
- Makeup Spatula
- Ben Nye Zombie Wheel
- Ben Nye Coagulated Blood (prefer to use scab blood)
Step 1: Scoop out a small amount of product—a little goes a long way. Before applying the wax to your skin, dip your fingers in a little bit of Vaseline.
Step 2: Begin smoothing out wax on skin carefully. Overtime you will need to reapply a small amount of Vaseline to your fingers. Don’t worry too much about the mound in the middle, as you smooth out the edges you’ll take some of that mound away. However, if you feel that you have applied too much modeling wax, you can use a spatula to remove excess product from the edges.
Step 3: Apply a small amount of Vaseline to a flat spatula and begin to create a cut in the middle of the mound of modeling wax. Wiggle the spatula back and forth to create more of an opening, if necessary. Flatten out edges of cut with fingers.
Step 4: Use a red cream paint to paint your cut to add some depth. You can use some translucent powder to take away shine from the modeling wax. This will make the wax look more like skin. For added effect, you can add coagulated blood.
’80s Cartoon
What You’ll Need:
- Urban Decay Electric Palette
- NYX Cosmetics glitter glue
- NYX Cosmetics gold pigment
- Pink glitter from Michael’s
- Lime Crime Mermaid Palette Highlighter
- Sticker sheet from Michael’s
Step 1: Take a pink liner and draw a geometric inspired by ’80s cartoon Jem and the Holograms shape on each side of your face and fill in each shape with neon pink eyeshadow.
Step 2: Marry your geometric shapes into your previous eye makeup by connecting them with the neon pink eyeshadow and blending.
Step 3: Apply glitter glue on top of your geometric shapes and plink glitter on top.
Step 4: Apply gold pigment beneath your bottom lid to add dimension and shine and use a fashion-toned highlighter wand swipe through cheek bone area.
Step 5: To embellish, add stickers to make any of your added designs easily applied, unique, and removable.
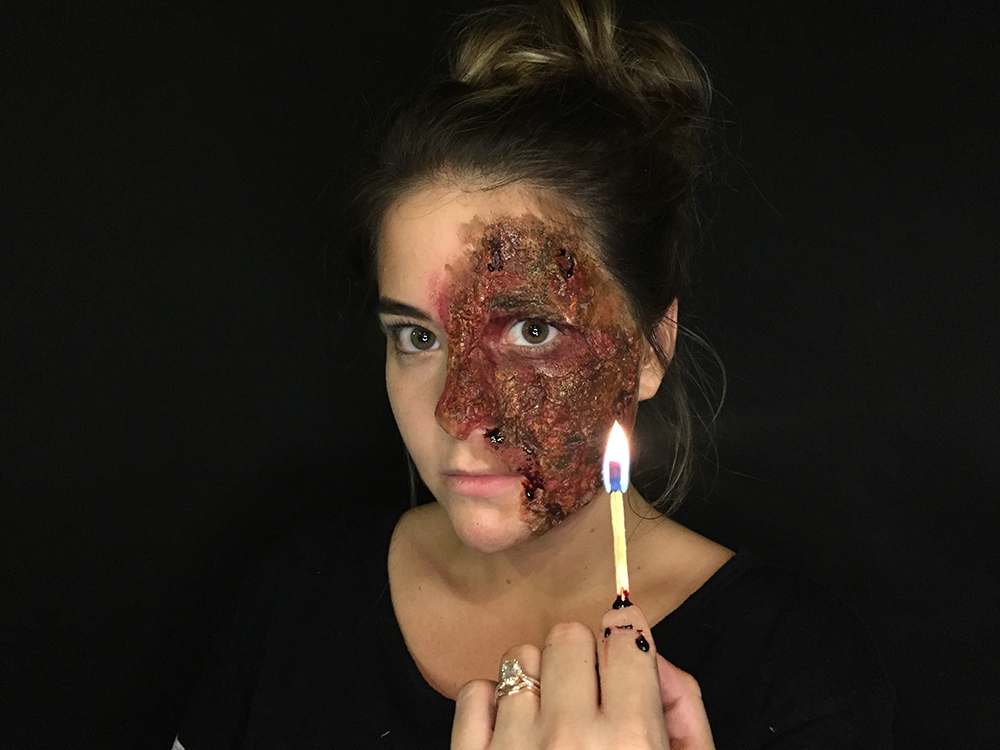
Burn Out
What You’ll Need:
- Liquid latex
- Skin Illustrator Starter Palette
- Ben Nye Zombie Wheel
- Ground Coffee
- Toilet Paper (1 ply)—can use tissue paper
- Vaseline
- Mehron Coagulated Blood Gel
Step 1: Prep hair that may come into contact with liquid latex by applying a thin layer of vaseline, in this case eyebrows and hairline.
Step 2: Apply liquid latex in thin layers and allow time to dry in between each. Once the final layer is applied, use a makeup spatula and fingers to tear holes into the latex.
Step 3: To give my burn some texture, add a few different mediums into the latex. Add a layer of liquid latex wherever you want to add your medium. While that latex is wet, add your medium (in this case, it’s coffee beans).Then add later of latex on top of beans.
Step 4: While this layer of latex is still tacky, begin to pull the latex apart to get holes and depth of the wound. Use toilet paper to give the illusion of charred skin. Repeating the steps you did for the coffee beans: Apply a layer of latex where you want to add toilet or tissue paper. Apply the paper and then a layer of latex over top. Before the latex and paper dries completely, begin to use your spatula or finger to rip holes in the latex.
Step 5: Wait for latex to completely dry before painting. Take your paint palette and fill in holes and edges of latex with dark brown color. Smudge colors around to make the wound splotchy and uneven by using fingers sponges or brushes for the edges of the latex.
Step 6: Take a red color and paint over everything—again the color can be splotchy and uneven (that’s what we are going for). Begin to fill in holes with darker colors: purples, blacks and browns. Be sure to use a cream paint in a red color around your eye area since alcohol activated paints can sting. You can also use your red cream paint on the wound itself to make areas brighter than others.
Step 7: Real burns have a lot of moisture. You can achieve this look by adding Vaseline or lubricant to the wound. Feel free to add some scab or coagulated blood for extra effect.