
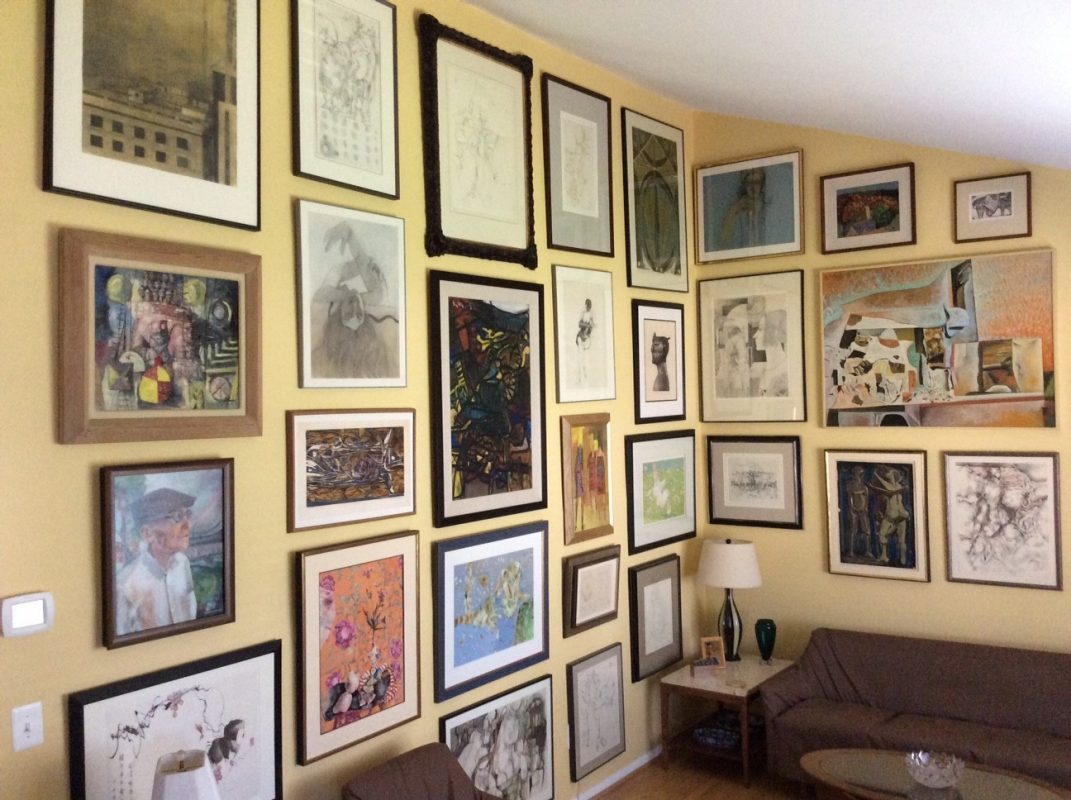
If you’ve ever spent 15 minutes browsing on Pinterest, you’ve seen at least one image of an airy, aspirational room with a perfectly designed gallery wall. You know the type—the “Oh, I just threw some things up there that I liked, and it all worked out,” gallery wall.
If only it were so easy.
The “effortless” gallery wall may be the biggest lie in home décor.
In reality, the gallery wall is where those of us who are interior design beginners encounter the perfect storm of frustration—where spatial reasoning (or lack thereof) meets precise measurements.
But we weren’t about to let that stop us. We went to the experts at Framin’ Place in Mt. Washington for insights on how to pull off hanging a gallery wall that has it all—beauty, style, and longevity.
Mark Thompson has been managing Framin’ Place for nearly 25 years—almost the entire time the business has been serving Baltimore’s art lovers. The shop’s pros specialize in helping Baltimoreans bring more beauty into their homes via their custom framing services.
Here, along with Thompson’s insights, we share some of the most useful tips and tricks for anyone looking to spruce up their space with their very own gallery wall.
Gather your artwork
The first, and most important step, is deciding what pieces to include in your gallery wall. Whether you want to stick to family photos or create a mishmash of artwork, photos, sculpture, and more, the beauty of the gallery wall is that there are no hard and fast rules about what can be included.
Select your frames
As with the artworks themselves, there are no strict rules about what types of frames to include in a gallery wall. The most important thing to take into consideration is how the grouping will look as a whole. “To mix it up can be really sharp, but you wouldn’t want to insert something that’s going to draw attention away from everything else on the wall,” says Thompson. “Using neutral mattes is important for a unified look. As far as frames go, you want to be sure they relate to each other style-wise. Staying within a color family, like all black finishes for a black and white photo wall, looks really great.”

If you’re looking to create a gallery wall with a modern feel, but with staying power, Thompson recommends sticking with something classic. “Throughout the years, we’ve seen trends come and go, but there are some timeless options, like natural hardwoods, or an all-black or all-white minimalist look.”
Protect your pieces
Chances are, you care about the artwork and photographs in your gallery wall. To guard against the damage UV light and acidic materials can cause over time, make sure your pieces are protected. At Framin’ Place, every project uses UV blocking glass and all acid-free materials. “Everything we do is to extend the life of the artwork,” says Thompson. “Often, people don’t realize how faded their artworks have become, since it happens over time.”

Choose a focal point
The eye will naturally go first to the largest piece on the wall, so make sure it’s something you really love. Whether it’s a wedding photo or a print of your favorite Matisse from the BMA’s Cone Collection, this will be the piece that you build the rest of your arrangement around. If you’re looking to make that piece stand out even more, consider using a special frame as an added highlight. “There are certainly ways to elevate a focal point piece. A more ornate frame than the rest of the wall, or a hand applied finish can really let people know that that’s a special piece,” says Thompson. “Look for something you can’t just find anywhere.”
Use stencils to create a layout
Rather than trying to decide on your final arrangement by holding your pieces directly up on the wall, you can make it easier on yourself with stencils. Thompson recommends laying out all your pieces on newspaper or brown craft paper, tracing each one, then cutting them out to create stencils. With a bit of patience and painters’ tape, you can shuffle your stencils around in the space where you want your gallery wall. Keep adjusting until the layout feels right and the spacing between elements is correct. You know what they say, measure twice, hammer once—especially if you rent!

Use the right hardware
If you’re a beginner, do some research into what the proper hanging hardware is for your wall. Brick, plaster, and drywall require different hardware, and the weight of the pieces you’re hanging is a factor as well. (For example, an expansion type screw with a plastic sleeve is best for hanging on brick walls, but drywall calls for a drywall screw.) “You want stability, and to make sure you’re not constantly moving your pictures to straighten them,” says Thompson. “Whether the proper hanging mechanism for the piece is wire or something else, we always put the appropriate hanging mechanism on each piece to make it a little easier for people once they bring the artwork home.”
Let your iPhone do some work
The compass app on your iPhone is hiding a super useful secret—a level! Open the compass, swipe right, and the screen of your phone will become a level. Hold that bad boy up on the top of each frame as you’re hanging, and it’ll show you if you need to scooch the piece a bit this way or that for it to hang straight.
Don’t be afraid to keep adding
You’ve hung the final piece and taken a step back to gaze upon the fruits of your labors, but that doesn’t have to mean your brand-new gallery wall is finished finished. A gallery wall’s organic, irregular borders lend themselves to future additions, or even swapping out artworks and frames as you wish. When you take that next perfect picture, simply grab a frame and add it on.